Expandable Graphic Equaliser
Introduction
The project described in this article is a constant Q, fully expandable graphic equaliser. Where most "conventional" graphic EQ circuits have a Q that is dependent on the setting of the pot, this one maintains the same Q at all settings. This is achieved by using MFB (Multiple Feedback Bandpass) filters, instead of the more common "gyrator" tuned circuit.
As always, there are pros and cons for the approach described here. Phase shifts tend to be a little more radical, and the passband has more ripple than a conventional circuit, but only where a number of sliders are set to boost or cut. On the positive side, specific frequencies are dealt with specifically regardless of the level, and not with a variable Q. The constant Q circuit makes room equalisation and feedback reduction far better behaved.
So much better in fact, that a boost or cut of 3dB or less may provide the required effect, where a variable Q equaliser may need considerably more, and will affect the adjacent frequencies to a far greater degree.
Description
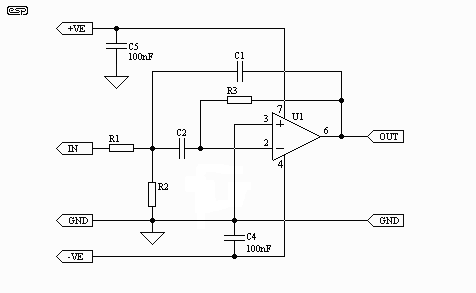
The filters used are the same as in the Instrument Graphic Equaliser, and are multiple feedback bandpass types. An example of this filter is shown in Figure 1, and more details are available from the project page for the MFB filter. Depending on the configuration you ultimately decide upon, you will need between 10 and 30 of these filters - per channel for stereo!

Figure 1 - Basic Multiple Feedback Bandpass
Filter
This circuit is reproduced from the original article for convenience - the actual filter circuits used are slightly different, and are shown in Figure 3. Building 60 of these may sound like an awful chore, which is perfectly reasonable, since it will be just that. With this knowledge at hand, this may go some way to help you make some ...
Decisions!
Now you have to decide on the frequency resolution. 1/3 octave would be really nice,
but the number of sliders can be a nightmare. At the very least, you will need
octave band, and the suggested (and industry standard) frequencies are ...
31 |
63 |
125 |
250 |
500 |
1k0 |
2k0 |
4k0 |
8k0 |
16k |
Should you decide on 1/2 octave band frequencies, 20 sliders will cover the range
suggested (plus a bit) - these might be ...
31 |
44 |
63 |
87 |
125 |
175 |
250 |
350 |
500 |
700 |
1k0 |
1k4 |
2k0 |
2k8 |
4k0 |
5k6 |
8k0 |
11k |
16k |
20k |
Lastly, 1/3 octave band needs 30 sliders to cover the full frequency range, but the
25Hz and 20kHz bands may not be needed. This still requires 28 slide pots, but the
flexibility is greater than you will ever get with conventional tone controls ...
31 |
40 |
50 |
63 |
80 |
100 |
125 |
160 |
200 |
250 |
315 |
400 |
500 |
630 |
800 |
1k0 |
1k2 |
1k6 |
2k0 |
2k5 |
3k2 |
4k0 |
5k0 |
6k3 |
8k0 |
10k |
12k |
16k |
There is no reason at all that the unit has to be 1/2 octave or 1/3 octave all the
way. The midrange can be 1/3 octave for finest control, but go to 1/2 octave at the
extremes. Especially for guitar and bass, I would prefer 1/3 octave up to 1kHz, then
1/2 octave from 1kHz to 8kHz. The final slider would be a 1 octave band filter at
16kHz. The sequence now looks like this ...
31 |
40 |
50 |
63 |
80 |
100 |
125 |
160 |
200 |
250 |
315 |
400 |
500 |
630 |
800 |
1k0 |
1k4 |
2k0 |
2k8 |
4k0 |
5k6 |
8k0 |
16k |
This gives 23 filters and slide pots, a reasonable compromise that should give
excellent results. To ensure reasonable continuity, the filters at 1kHz and 8kHz
will need to be a compromise. 1/3 octave filters need a Q of 4, and 1/2 octave
filters use a Q of 3, so the 1kHz filter will actually have a Q of 3, and the 8kHz filter
will be best with a Q of 2. This might look daunting, but the MFB Filter design program will make
short work of determining the component values. Unfortunately, this is only
available for users of Microsoft Windows. If you want to use the frequencies shown
above, the following table shows the values for each filter.
| Freq | R1 | R2 | R3 | C1, C2 | Freq | R1 | R2 | R3 | C1, C2 | |
| 31 | 82k | 2k7 | 160k | 220nF | 500 | 27k | 820 | 56k | 47nF | |
| 40 | 82k | 2k7 | 160k | 180nF | 630 | 27k | 820 | 56k | 39nF | |
| 50 | 82k | 2k7 | 160k | 150nF | 800 | 27k | 820 | 56k | 27nF+2n7 | |
| 63 | 82k | 2k7 | 160k | 120nF | 1k0 | 8k2 | 510 | 18k | 47nF+4n7 | |
| 80 | 82k | 2k7 | 160k | 100nF | 1k4 | 8k2 | 510 | 18k | 39nF | |
| 100 | 82k | 2k7 | 160k | 82nF | 2k0 | 8k2 | 510 | 18k | 27nF | |
| 125 | 82k | 2k7 | 160k | 56nF+5n6 | 2k8 | 8k2 | 510 | 18k | 18nF+1n5 | |
| 160 | 82k | 2k7 | 160k | 47nF | 4k0 | 8k2 | 510 | 18k | 12nF+1n8 | |
| 200 | 82k | 2k7 | 160k | 39nF | 5k6 | 8k2 | 750 | 18k | 8n2 | |
| 250 | 82k | 2k7 | 160k | 27nF+4n7 | 8k0 | 8k2 | 1k2 | 18k | 4n7 | |
| 315 | 82k | 2k7 | 160k | 22nF+2n7 | 16k | 8k2 | 1k2 | 18k | 2n2 | |
| 400 | 82k | 2k7 | 160k | 18nF+1n5 |
I have tried to keep the values reasonably sensible. This is not easy with 1/3 octave band equalisers, but all in all the results are quite acceptable (not too many different values). Note that the Q of the filters is changed as the frequency increases - feel free to use the calculator to reverse calculate the values to see the actual gain, Q and frequency error. None of these will be significant in use.
Input / Output Stage
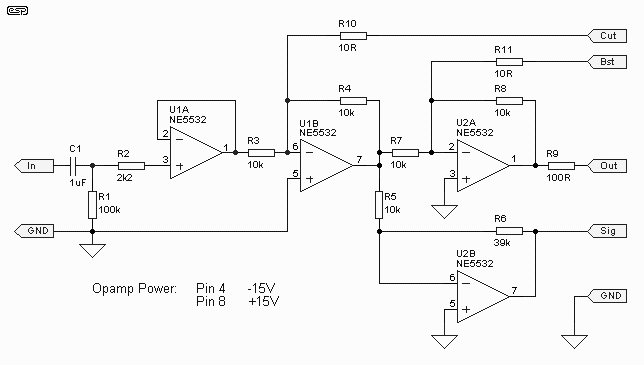
The heart of the circuit is shown in Figure 2. It is not complex, but care is needed to make sure that the opamps do not oscillate. Supply bypassing is critical, and 100nF ceramic caps must be used between supply pins at each opamp package.

Figure 2 - Input / Output Stage
There is one thing of special note in this circuit. R6 (39k as shown) determines the maximum amount of boost and cut, and if you wanted to, you can make it variable. With the filter circuits shown below, 39k allows a boost and cut of 12dB - which is about right in most installations. A value of 10k will allow a maximum of a little over 5dB. Any value between these limits will provide the optimum for a given environment, and this can be preset. This is a very useful feature, and one that I believe is unique to this circuit.
Filters
Determining the required Q is the first step in the design
process. The requirements are shown in the following table. The gain in each
case is unity (actually -1, meaning a gain of unity, but the signal is inverted, or 180
degrees out of phase).
| Bandwidth | Required Q |
| 1/3 octave | 4 |
| 1/2 octave | 3 |
| 1 octave | 2 |
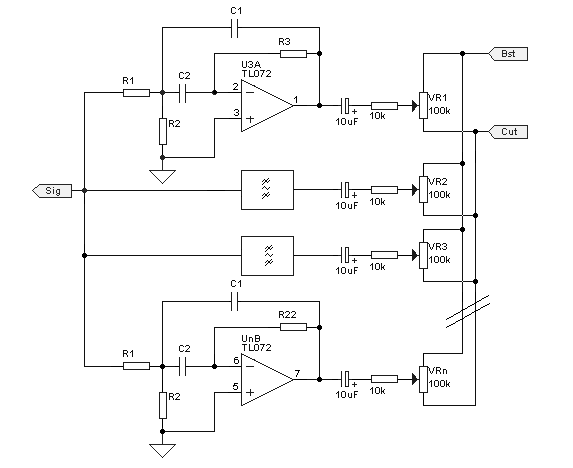
The filters are all connected in the same way, and I do not intend to draw all 30 of them! Instead, I shall show two complete and two partial filters - you will be able to take it from there. The tables above, and/ or the MFB calculator program can be used to determine the values for each individual filter.

Figure 3 - The Filter Bank (Partial Only)
The slide pots are wired with all the end connections in parallel, and the "Sig" output above must drive all the filter inputs, which are also in parallel. For a 1/3 octave equaliser, this represents a load of around 800 ohms on U2B. The NE5532 was chosen as it is one of the few opamps that will drive such a low impedance. Don't be tempted to use anything that is not rated to drive such a low impedance, or it will distort because of output current limiting. Another suitable opamp is the OPA2134 (dual), which also has a very high drive capability - there are no doubt others, but these are the ones I know about.
The maximum rated input voltage is 1V (0dBu), and if you anticipate that the input will be higher than that, I suggest an attenuator at the input. The gain can be restored by increasing the value of R8, so if a 3:1 attenuator were used at the input (10dB), then a 30k (33k would be OK) resistor in place of the 10k will bring the overall gain back to unity.
Remember that U2B operates with gain (about 12dB), so the internal overload limit is lower than you might expect. Because of the narrow bandwidth of each filter, these too can be driven into clipping if the input level is too high, and this is unlikely to improve the sound.
Overall, this is a very versatile unit, and once the initial shock of construction has passed, can be used for the most demanding of equalisation tasks. It can also be used in an automotive installation, but an artifical earth must be created, and the signal voltage limits will be reduced considerably. I suggest that the maximum input voltage be kept below 0.5V RMS - lower than this will provide a better safety margin, and will ensure that clipping does not occur regardless of slider settings.

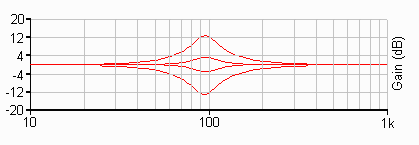
Figure 4 - Frequency Response of a Single Filter
Figure 4 shows the boost and cut of a single filter, centred on 95Hz. This clearly shows that the Q remains constant - a conventional graphic EQ would have a very broad peak at lower settings, so broad in fact that it would show some noticable effect even at the frequency extremes. Assuming that the 50% pot setting is flat, these graphs were taken at 25/75%, and 0/100% of the pot travel (cut/boost respectively).
The graph is deliberately showing only a decade above and below the centre frequency, so that the response may be seen more clearly. This was generated using a 39k resistor for R6 in the input circuit - lower values reduce the maximum boost and cut, but leave the Q unchanged.


