


Tone Control
This simple tone control can be used in may audio applications. It can be added to amplifers, used as a stand alone control module, or even built into new and exciting instruments. It's one IC construction makes it a very compact circuit, as only a few support components are required. Plus, it does not use a dual power supply. This means that the circuit will run from 9V to 15V (although the bass will be a little weak at 9V). The circuit is by Robert Barg and originally appeared in the Think Tank column of the May 1998 issue of Popular Electronics.
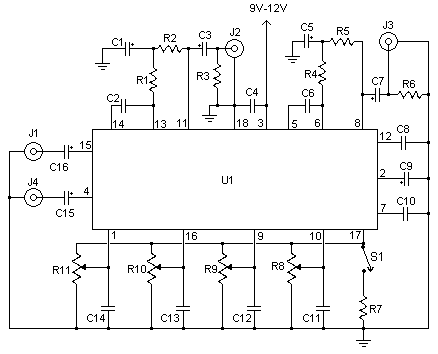
Schematic
Parts:
|
|
|
|
|
| C1, C3, C5, C7, C15, C16 | 6 | 2.2uf Electrolytic Capacitor | |
| C2, C6 | 2 | 0.05uF Ceramic Disc Capacitor | |
| C4 | 1 | 0.22uF Disc Capacitor | |
| C8, C10 | 2 | 0.015uF Ceramic Disc Capacitor | |
| C9 | 1 | 100uF Electrolytic Capacitor | |
| C11, C12, C13, C14 | 4 | 0.1uF Ceramic Disc Capacitor | |
| R1, R4 | 2 | 10K 1/4W Resistor | |
| R2, R5 | 2 | 33K 1/4W Resistor | |
| R3, R6 | 2 | 4.7K 1/4W Resistor | |
| R7 | 1 | 2.2K 1/4W Resistor | |
| R8, R9, R10, R11 | 4 | 50K Linear Pot | |
| U1 | 1 | TDA1524A Tone Control IC | |
| S1 | 1 | SPST Switch | |
| J1, J2, J3, J4 | 4 | RCA Jacks | Other connectors of your choice |
| MISC | 1 | Board, Wire, Knobs, 18 Pin Socket |
Notes:
1. S1 is a contour control. Volume is controlled by R11. Balance is controlled by R10. R9 and R8 control bass and treble, respectivly.
2. J1 is the left input, J4 is the right input. J2 is the left output, J3 is the right output.
3. The circuit is designed to accept line level or mic level inputs. if you are going to be using a stronger signal, a voltage divider will be necessary to cut it down to proper levels.
4. You can, of course, skip J1-J4 if you plan to integrate this circuit into another.