PIC Theory & Design
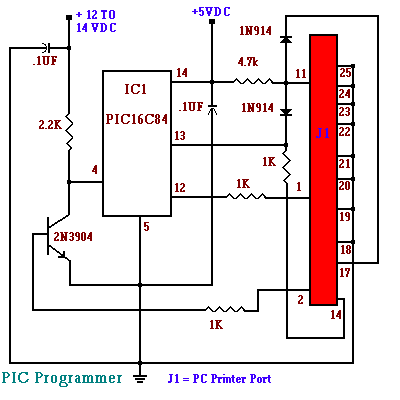
The following information was extracted from the September 1998 Electronics Now Magazine. The author of the article was Michael A. Covington. In Michael's article he acknowledges the contribution of David Tait in regards to the "TOPIC" program. This project provides the beginning of a Learning Series on PIC micro controller. I will be providing other projects based on PIC in the future and therefore this project, PIC Programmer, is necessary for any future projects. It will allow you to program a PIC to perform functions that in the past would require numerous IC chips.
What is a PIC?. Well, like other micro controllers it is a tiny computer with CPU, ROM, RAM, and I/O circuits all on one chip. I will be focusing my projects on the inexpensive PIC's that are on the market. The chips that I will be using will be 16C84, 16F83 and 16F84. These chips are around $6.00. Because the ROM inside the chips are electrically erasable, the same PIC can be reprogrammed many times for different types of projects. Any information stored in the PIC will be held for more then 40 years, without power applied, until it is electrically erased. Unlike other micro controllers, these PIC's do not require quartz crystals or resonators for their clock; you can simply use a resistor and capacitor as the oscillating elements.
The project presented here will provide you with the ability to program a PIC from your parallel printer port on your PC computer. To program a PIC is relatively simple. A standard 5 volt DC supply voltage is connected to pin 14 and ground is connected to pin 5. Now bring the voltage on pin 4 to between 12 and 14 volts dc. The data is clocked in one bit at a time through pins 13 and 12. The data itself is sent to pin 13. Once the bit is ready, the voltage on pin 12 is raised to 5 volts for at least 0.1 microseconds before being lowered back to ground. The data that was sent to the chip can sent back out of the chip on pin 13 to verify he accuracy.
The best way to learn to use this circuit is to actually write a program for the PIC and burn it into the chip. The first practical project will be the September Project of the Month. So lets get the programmer built and lets start making projects for the PIC.

PIC Light Chaser
This month I am continuing with the PIC projects that I started in August. To be able to build this circuit you must build the August circuit which allows you the ability to program PIC's.
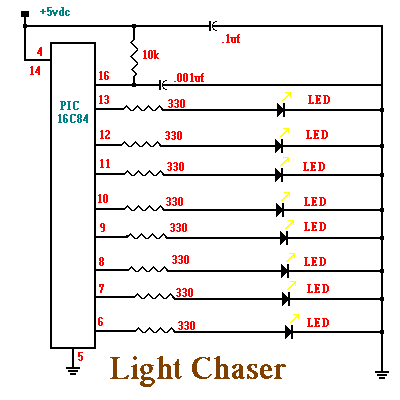
The circuit this month is a simple 8 light chaser built around a PIC. This will demonstrate how easy it is to program a PIC and to utilize it in a circuit. The circuit works as follows. When power is supplied to the circuit the PIC resets and starts to process instructions that are programmed into it. The program will turn on each LED in sequence with a small delay between each one. It will continue to do this until power is removed. The nice feature with this circuit is that you can program it to perform many complex lighting sequences. Normally you would have to rebuild a hardware based circuit to change the light sequence. With a PIC all you need to do is reprogram it and plug it back into the circuit. I am assuming that you will be using an IC socket. The circuit is show below and then I will discuss the program that is programmed into the PIC.

The program is listed below:
;File DEMO.ASM
;Assembly code for PIC16F84 micro controller
;Blinks LED's on the outputs in a rotating pattern.
;With 75khz osc, each LED stays on half a second.
;CPU configuration
; (its a 16F84,RC Oscillator, watchdog timer off, power-up timer on)
processor 16f84
include <p16f84.inc>
_config _RC_OSC &_WDT_OFF &_PWRITE_ON
;Declare variables at 2 memory locations.
J equ H'1F' ;J=Address hex 1F
K equ H'1E' ;K=Address hex 1E
;Program
org 0 ;start at address 0
;Set port B as output and initialize it
movlw B'00000000' ;w : =00000000 binary
tris PORTB ;port B ctrl register := w
movlw B'00000001' ;w := 00000001 binary
movwf PORTB ;port B itself := w
;Rotate the bits of port B leftward
mloop: rlf PORTB,f
;Waste some time by executing nested loops.
movlw D'50' ;w := 50 decimal
movwf J ;J :=w
jloop: movwf K ;K :=w
kloop: decfsz J,f ;J = J -1, skip next if zero
goto kloop
decsz J,f ;J = J - 1, skip next if zero
goto jloop
;Do it all again
goto mloop
end
The program works as follows. The first few lines in the program are what is called comment lines. Comment lines assist us in documenting what each part of the programs function is. If a program is commented well, then it will be easier later own to understand why the program was written the way it was. Any line that begins with a semicolon is a comment line and will be ignored when the assembler is run. The assembler is another program that will convert these written instructions and convert them to binary data to be programmed into the PIC. The first true commands that the PIC will process is the processor, include and _config. These instructions tells the assembler that it is using 16F84 instructions. The second instruction says to include a set of predefined constants in a file called P16F84.inc. Finally, the third instruction sets various configuration bits in the PIC to turn on the RC Oscillator, turn off the watch dog timer and turn on the automatic power up reset timer. That way the PIC will reboot every time power is applied. The two equ instructions reserve memory space in the PIC's RAM for two variables, which is being called "J" and "K". The locations are in Hex 1E and 1F. Theses locations will be used to store counters to keep track of how many times a loop has been repeated. The org instruction tells the assembler that the program starts at location 0. in the program memory and that the actual program is next. The first real PIC instruction is a
movlw instruction that clears the working register called W. That number is then copied into the TRIS control register for Port B, setting pins 6 - 13 to outputs pins instead of input pins. Next the program puts binary 00000001 into the W register and copies it to Port B. That lights the LED connected to pin 6. But before you have time to actually see the LED come on, the program executes an rlf instruction that rotates the contents of Port B to the left , changing the data to 00000010. That will light the LED on pin 7 instead. Repeating that instruction will give 00000100, and then 000010000 and so on, making the LED's flash in a marching pattern. In between rotations, the program needs to wait about a half second so that action isn't to fast to see. That is the purpose of the delay loop. It stores the decimal number 50 in memory locations "J" and "K" using decfsz instruction to count down from 50 to 0. The decfsz instruction means " Decrement and skip next instruction if zero. The last instruction in the program is mloop which sends the program back to the beginning. The end instruction is not a CPU instruction. Instead it tells the assembler that the program is over. To compile the program for the PIC we will be using a program that can be downloaded directly from the Microchip Web site. The program is called MPLAB. It is a developmental program for compiling and testing PIC programs. It will run under Microsoft Windows. The second piece of software that will be needed is the No Parts Programmer (NOPPP) that also works under Microsoft Windows. The use of the program is straight forward. You will load an object file that was created by MPLAB and program it into the PIC. After successfully programming the PIC and testing the circuit, try to modify the program to light the LEDS in a different pattern and then reprogram the PIC and test it.
Sourse:www.home.maine.rr.com


