


DIY intervalometer for Sony NEX
I decided to make a DIY intervalometer for my Sony NEX 5N camera so that I could do time-lapse photography. This intervalometer should work with most Sony cameras: NEX, Alpha and other. To work intervalometer used infrared LED
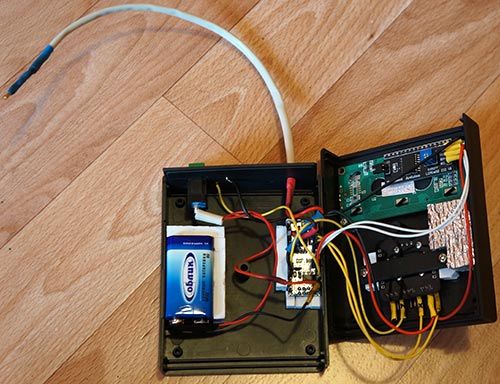
To built intervalometer you need:
Arduino Nano (or Arduino-compability)
Serial LCD
Joystick Module
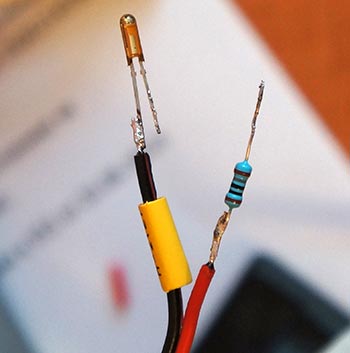
IR Led and resistor ~200 Ohm
Switch
Push Button
Plastic enclosure
Battery 9V
Schematic:
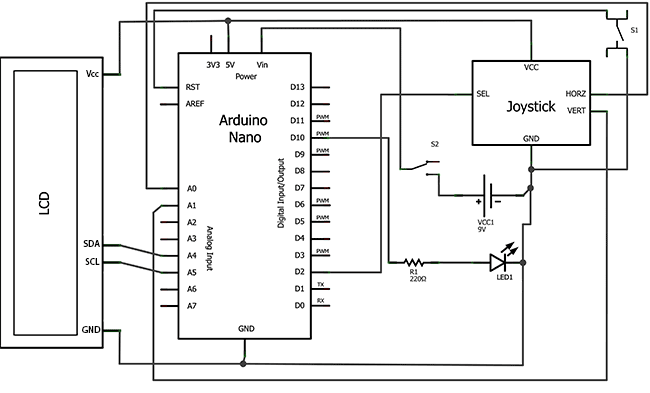
Serial LCD has 4 output: GND, VCC, SDA, SCL. SDA (data) connect to Arduino Analog In 4, SCL (clock) connect to Analog In 5. Vcc connect to 5V Arduino, and GND connect to GND Arduino.
The joystick is connected by five wires: axis X (connect to Analog IN 0), axis Y (to Analog IN 1), axis/button Z (to Digital IN 2), supply Vcc and GND.
Connection Diagram:

Circuit is powered by 9V battery. Battery positive output connected to the input Vin Arduino. Arduino has a built-5V voltage converter that we need to power the Serial LCD. The anode of the IR LED is connected through current limiting resistor and connected to 10-pin Arduino. Cathode of the IR LED connected to GND.
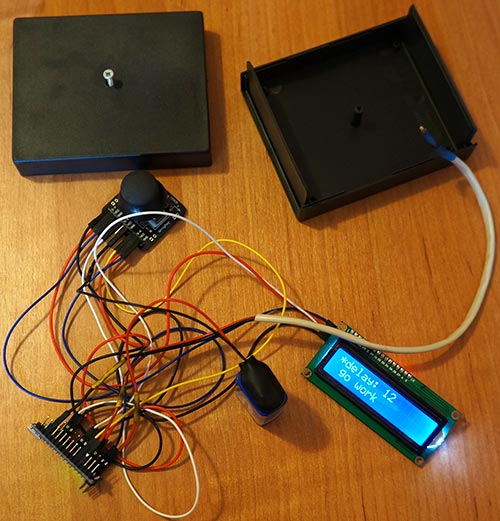
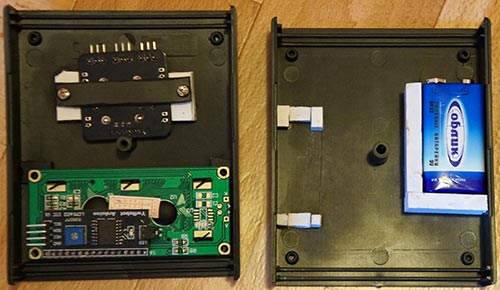
Assembling:


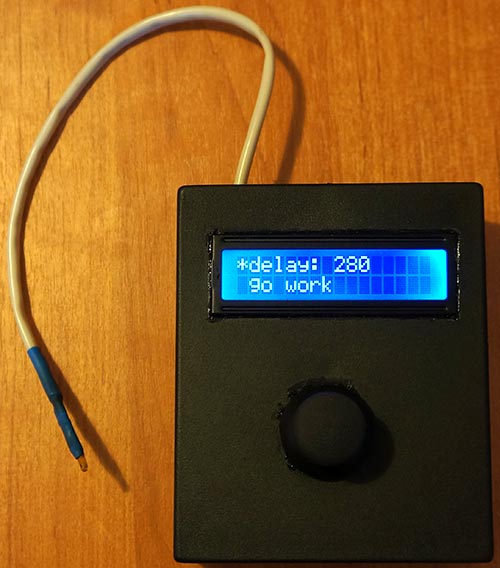
Software
To save battery life in the software has a function the LCD backlight off. When you press any key, the LCD backlight turn on.
Source code:
// Article https://english.cxem.net/arduino/arduino6.php
// Version 1.0

#include "Wire.h"
#include "LiquidCrystal_I2C.h"

#define axis_X 0    // axis X of Joystic connected to Analog 0
#define axis_Y 1    // axis Y of Joystic connected to Analog 1
#define axis_Z 2    // axis-button Z of Joystic connected to Digital 2
#define pinIRLED 10 // IR LED
#define LEDgreen 13 // onboard LED

#define autoOFF 10  // autoOFF backlight LCD

LiquidCrystal_I2C lcd(0x27,16,2);    // set the LCD address to 0x27 for a 16 chars and 2 line display

int value_X, value_Y, value_Z = 0;   // axis values
int pos = 0;                         // current position (0 - delay, 1 - work)
int interval = 1;                    // pause between shots (sec)
int cntPict = 0;                     // shots count
boolean working = false;

unsigned long currentTime;
unsigned long TimeShot, TimeLCDOff;

void setup()
{
  pinMode(axis_Z, INPUT);         // Joystic button
  pinMode(pinIRLED, OUTPUT);      // IR LED

  lcd.init();                     // init LCD
  lcd.backlight();                // turn LCD backlight ON
  lcd.clear();                    // clear LCD
  show_menu();                    // function show menu

  currentTime = millis();
  TimeShot = currentTime;         // shots timer
  TimeLCDOff = currentTime;       // backlight timer
  //Serial.begin(115200);
}

void loop()
{
  value_X = analogRead(axis_X);    // read the analog value of the X axis
  value_Y = analogRead(axis_Y);    // read the analog value of the Y axis
  value_Z = digitalRead(axis_Z);   // read the digital value of the Z axis (button)
  value_Z = value_Z ^ 1;           // invert the value

  if(working == false){
    if(value_Y > 540){              // joystick up
      pos = 0;
      lcd.backlight();              // LCD backlight ON
      TimeLCDOff = currentTime;     // new value of TimeLCDOff
      show_menu();
    }
    else if(value_Y < 500){         // joystick down
      pos = 1;
      lcd.backlight();              // LCD backlight ON
      TimeLCDOff = currentTime;     // new value of TimeLCDOff
      show_menu();
    }
    if(value_X > 530){              // joystick left
      lcd.backlight();              // LCD backlight ON
      TimeLCDOff = currentTime;     // new value of TimeLCDOff
      if(pos == 0){
          --interval;
          if(value_X > 900) interval = interval-10;  // joystick full left
          if(interval < 1) interval = 1;
      }
      show_menu();
    }
    else if(value_X < 490){         // joystick right
      lcd.backlight();              // LCD backlight ON
      TimeLCDOff = currentTime;     // new value of TimeLCDOff
      if(pos == 0) {
          ++interval;
          if(value_X < 100) interval = interval+10;  // joystick full right
      }
      show_menu();
    }
  }

  if(value_Z == 1){               // joystick button press
    lcd.backlight();              // LCD backlight ON
    TimeLCDOff = currentTime;
    if(working == true){
      working = false;
      pos = 0;
      show_menu();
    }
    if(pos == 1) show_working();  // turn on work mode
  }

  delay(200);

  currentTime = millis();
  if(working == true){
    if(currentTime >= (TimeShot + (interval*1000))){
      digitalWrite(LEDgreen, HIGH);                   // blink onboard LED
      delay(100);
      digitalWrite(LEDgreen, LOW);
      takePicture();                                  // send IR
      TimeShot = currentTime;
      ++cntPict;                                      // increase the counter shots
      show_working();                                 // refresh LCD
    }
  }

  if(currentTime >= (TimeLCDOff + (autoOFF*1000))){
      lcd.noBacklight();                              // LCD backlight OFF
  }

}

void show_menu()
{
  cntPict = 0;        // zero out counter shots

  lcd.clear();
  lcd.setCursor(0, pos);
  lcd.print("*");     // current position

  lcd.setCursor(1, 0);
  lcd.print("delay:");

  lcd.setCursor(8, 0);
  lcd.print(interval);

  lcd.setCursor(1, 1);
  lcd.print("go work");
}

void show_working()
{
  lcd.clear();
  lcd.setCursor(3, 0);
  lcd.print("working...");
  lcd.setCursor(2, 1);
  lcd.print("shots:");
  lcd.setCursor(9, 1);
  lcd.print(cntPict);
  working = true;
}

void pulseON(int pulseTime) {
  unsigned long endPulse = micros() + pulseTime;        // create the microseconds to pulse for
  while( micros() < endPulse) {
    digitalWrite(pinIRLED, HIGH);                       // turn IR on
    delayMicroseconds(13);                              // half the clock cycle for 38Khz - e.g. the 'on' part of our wave
    digitalWrite(pinIRLED, LOW);                        // turn IR off
    delayMicroseconds(13);                              // delay for the other half of the cycle to generate wave/ oscillation
  }
}
void pulseOFF(unsigned long startDelay) {
  unsigned long endDelay = micros() + startDelay;       // create the microseconds to delay for
  while(micros() < endDelay);
}
void takePicture() {
  for (int i=0; i < 2; i++) {    // impulse send twice
    pulseON(2336);
    pulseOFF(646);
    .......
    .......
    .......
    pulseON(99);
    pulseOFF(646);
  }
}
Video:
Download source code for Arduino
Author: Koltykov A.V.